Photorealism Decoded with Jesse Lane: Oceans of Layers
[1st Place Winner in the 2nd Edition of Boynes Emerging Artist Award] Jesse Lane details his layering techniques for a photorealistic portrait in colored pencil
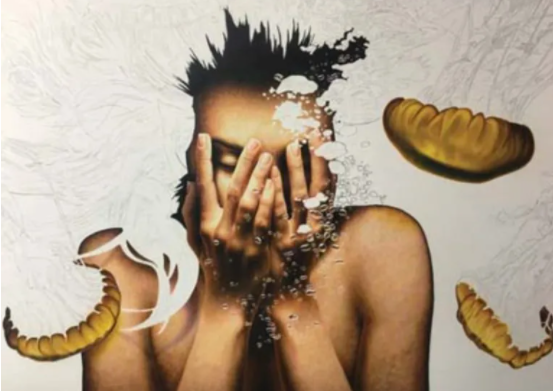
When people think of colored pencil, they often think of unskilled scribbles of color. In recent years, however, artists have begun to pick up their pencils and shatter preconceived notions about this medium, especially when it comes to expertly rendered photorealism.
So why use colored pencil in fine art? A colored pencil can be sharpened to a precise point, which is terrific for capturing detail, making it an ideal tool for photorealism. The process is slow by necessity, giving the artist better control. Using multiple layers of pencil can provide rich results with little to no evidence of lines, and drawing in this way will make the piece as vibrant as a painting. These are just a few of the reasons why I’ve chosen colored pencil as my primary fine art medium.

Jesse Lane in his studio, working on one of his masterpieces of photorealism.
Techniques and Materials
There are a few techniques that are key to creating realistic work in colored pencil. The first is layering. By lightly applying multiple layers, artists can achieve soft transitions in value and color. Colored pencil is solid—not liquid—so it doesn’t blend like paint. Creating smooth transitions requires consistent layering with light pressure.
For a surface, I prefer a rough paper that can easily handle layers, allowing for richer values and colors. After I put down some light layers, I burnish. This is the process of filling in the tooth of the paper so that none of the paper shows through. It allows for more color contrast and saturation. Burnishing makes drawings appear less faded and more striking, like a painting. The key is to burnish with many layers of light pressure and not to rely on hard pressure—as is sometimes tempting. Using this technique eliminates the possibility of visible stroke marks which makes photorealism more achievable.
There are various types of colored pencils, and each behaves differently. A soft pencil applies color quickly, but holds less of a fine point, so it’s not ideal for details. A hard pencil is better for detail, but not very useful for base tones and blending. I find Derwent Lightfast to be best for detail, but I also use Derwent’s Coloursoft and Drawing lines, as well as Prismacolor Premier.
My technique for drawing skin involves stippling—placing thousands of tiny dots on the paper. I usually prefer to use a soft pencil for stippling to avoid damaging the drawing.
Materials
SURFACE: Strathmore Bristol Board 500 Series vellum 4-ply
COLORED PENCILS: Derwent Lightfast, Derwent Coloursoft, Derwent Drawing, Prismacolor Premier
MISC.: X-Acto knife
Value and Color
I also use a technique called grisaille, in which I draw in all the values of the image in shades of brown before adding color. While it’s essential to get rich colors into a finished piece, it’s also important to realize that not everything is saturated with color. In some areas colors will pop, but in many areas, the colors will be more muted. Letting some colors recede allows others to stand out, creating a stronger focal point.
In reality, no object or person is one color throughout, even if it appears that way. Everything contains varying hues. Skin tones largely contain peach, tan and brown. There are splotches of color, however, that whisper their presence. In my work, these colors tend to be pink, yellow, purple, orange, green or gray. Many of my students will tell me that they don’t see these colors in skin tones, but including them is actually key to making realistic portraiture. Together with the base skin tone, they contribute to the depiction of an organic, lifelike face that achieves convincing photorealism.

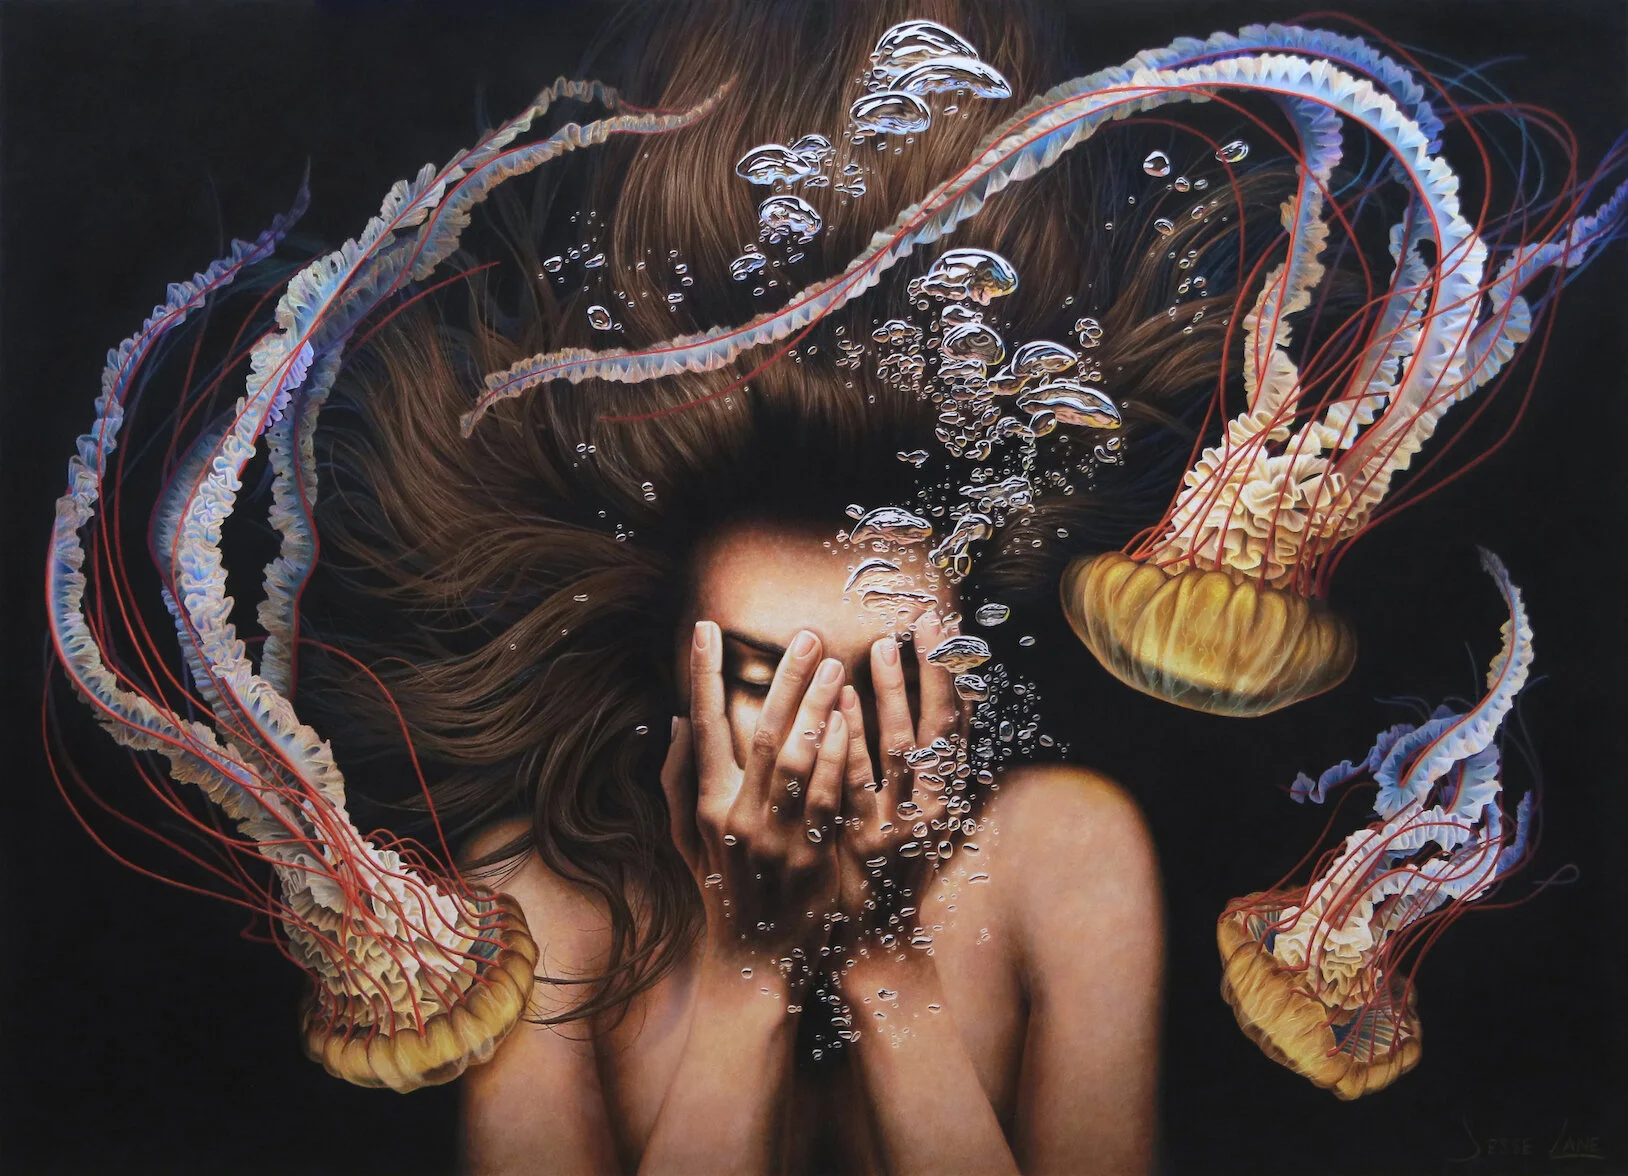
Face Reality by Jesse Lane (colored pencil on paper, 23 x 40)
All in the Details
There’s a distinctive and important process to layering with colored pencil. The first layers are more prominent than the last ones, so it’s a good idea to work from the general to the specific. For example, I’ll color a subject’s nose with a flesh tone before drawing in pores. This makes the final layers subtle. I apply this same technique when drawing hair and wrinkles. Details are always last.
Colored pencil pigment is waxy and can be scraped off for strategic purposes. I like to use an X-Acto knife as my scraping tool. By scratching off a thin line of color and exposing the white paper beneath, I can create realistic highlights in hair, for example, or the shine on a single drop of water. X-Acto knives allow for extreme precision.
While humble in appearance, the colored pencil is proving capable of providing astounding results, including highly accomplished photorealism. While technique isn’t everything, it’s the messenger of the artist’s voice, and thus, essential for communicating an artist’s unique vision.
Step-by-Step: Abyss
Step 1
I want most of the viewer’s attention on the face and hands of the subject in this drawing, so I used the most contrast in those areas. I included pure white highlights on several of the subject’s fingers, but made the colors here warmer overall. Much of the composition circles around this area.

Step 2
On the subject’s body I drew in duller highlights with less saturation. I also added yellow shadows to her body to indicate the proximity of the jellyfish. I darkened her body as it approaches the edge of the piece to keep the viewer’s eye from running off the image.

Step 3
The jellyfish “heads” consist of two parts: a thin outer layer and an inner layer. I drew the inner layer first. While I drew the outer layer, I added highlights, shadows, and even veins to make this layer seem transparent.
Step 4
I used light pressure to prevent stroke marks in dark areas and created this black background in one sitting. I’ve discovered that if I stop working on a black background for a few hours and then come back to it, a seam appears between the old and new sections.

Step 5
I designed the hair to create a halo around the subject’s head, so I used an X-Acto knife to create highlights that curve around her face. As the hair recedes, I introduced blue for an added sense of depth.
Step 6
I drew the bubbles with hard and soft edges. Many of them are wider than they are tall as they push their way upward. Each bubble has white on top with a black underlining, and the middle of each bubble is filled with the color behind it for the effect of transparency. The bottoms and sides of the bubbles reflect colors from their surroundings. I played up these reflections to enhance the magical quality of the drawing.

Step 7
The tentacles were the hardest part of painting Abyss (colored pencil on paper, 28 x 39). They’re composed of many tiny folds that weave and spiral. I used a grisaille technique here, rendering values first and colors second. The parts of the tentacles that sit next to the jellyfish “heads” reflect yellow in an upward direction. The tentacles become bluer as they recede and include hints of flesh color reflected from the subject. While Abyss is realistically drawn, it’s clearly a dreamy interpretation of reality. It’s my vision of a weightless, swirling world of bubbles, hair and jellyfish, where the warmth of the subject contrasts with the deep darkness of the abyss.
About the Artist
Jesse Lane (jesselaneart.com) has received wide acclaim for his compelling portraits, including top awards from the Salmagundi Club, the Colored Pencil Society of America and the International Guild of Realism. The artist lives in The Woodlands, Texas, and teaches workshops nationwide in order to advance colored pencil as a fine-art medium. He’s represented by RJD Gallery in New York.
This article was written by the Artists Network team from an interview with Jesse Lane. Click here to view the original article.